

Guide to your Pre-Payment Account
Your Pre-Payment Account
This page covers the pre-payment account functionality available to Repair Outlet Account users of the 1link Service Network platform. The system is upgraded occasionally, therefore if this information does not mirror the system you are currently using please contact our Product Support Department for the latest version of this guide.
What is the Pre-Payment Account?
When you join 1link Service Network, we create a Pre- Payment Account. Transaction fees for using the 1link platform are taken from this when you create a new job sheet and when you receive a future work booking through the platform.
The Pre-Payment Account works on a ‘top-up’ basis. It operates in the same way as a mobile phone pre-pay account or an e-toll account. If your funds run low you will receive a warning stating that your account requires a top-up.
Your Repair Outlet Account User can instantly top-up this account by clicking on ‘Pre-Payment Account’ from their home page.
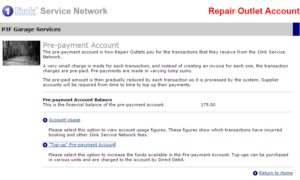
From the Repair Outlet Accounts User home page, select the option ‘Pre-Payment Account’.
Within the Pre-Payment Account screen, you can see your current balance and have options to either view ‘Account Usage’ or ‘Top up Pre-Payment Account’ ‘Top-up’ your Pre-Payment Account
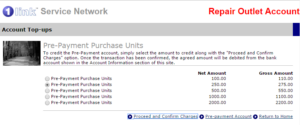
Once you select ‘Top up Pre-Payment Account’ you can specify the amount that you wish to top-up by, and then ‘Proceed and Confirm Charges’
You are then presented with a confirmation screen. Select ‘Pay by Direct Debit’ to confirm the charges and instantly top-up your account.
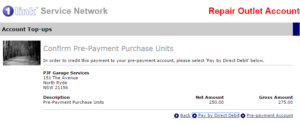
Note: By topping up your account you do not create any recurring charges. Your account will only be topped up when you carry out this process.
Once you have confirmed the charges you have the option to view the invoice and print a copy.

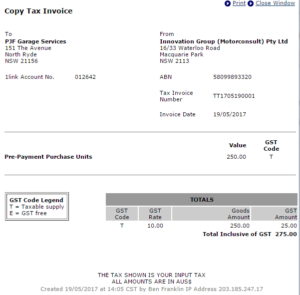
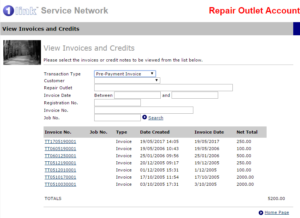
If you wish to do this at a later stage, the invoice is visible through the ‘View Invoices’ link on your home page. Simply change the criteria to search for Transaction Type ‘Pre-Payment Invoice’. Click on the invoice reference number to view and print a copy.
Account Usage Reporting
The Account Usage option allows you to report on your Pre-Payment Account usage at any time. The usage screen shows a break down of each individual charge amount and what it was for.
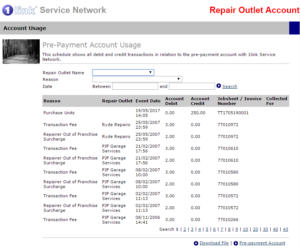
If you have multiple sites using the same Pre-Payment account, you can report on all sites or a specific site. You can also search for charges between certain dates.
If you wish you can download the report by clicking on ‘Download File’.
Frequently Asked Questions
Q: When I ‘top-up’ my account, how is the payment taken?
A: When you initially joined up to 1link, you signed a direct debit agreement that permits us to withdraw the amount of funds approved by you during the pre- payment top-up process from your bank account. This allows us to instantly top-up your 1link pre-payment account.
Q: What happens if I run out of funds?
A: If your pre-payment account drops below the amount needed to transact on the platform, the Repair Outlet user will receive a warning message stating “Your pre-payment account currently has insufficient funds to request authorisation. Your accounts user can increase the balance of this account”. The option to ‘Request Authorisation’ will not be available on the job sheet until
the account is topped up.
Q: Will the platform ever ‘top-up’ my account automatically?
A: No. Your account will only be topped-up when your Repair Outlet Accounts user requests a top-up. We suggest you set up additional Repair Outlet Accounts users (through the ‘user administration’ link on the homepage) to ensure that someone is always available to top-up the account if your funds run low.
Q: I’ve not yet made a ‘top-up’ so why have I been able to use the platform?
A: When you initially joined 1link, we credited your pre-payment account with $25 in order for you to start using the platform.
Q: How do I print an Invoice?
A: When you complete a payment, you have the option to ‘View Invoice’ and then the option ‘Print Invoice’. You can also view and print the invoice from the ‘View Invoices’ option on the home page.