

Your guide to creating a job sheet
This guide has been created to help you to create a job sheet on 1link Service Network. The system is upgraded occasionally, and therefore if this information does not mirror the system you are currently using, please contact our Product Support Department for the latest version of this guide.
STEP 1
Create a job sheet
From the main menu select ‘Create Worksheet/booking’ and enter the car registration number. Select ‘Search database’ to find any matching vehicles. In the search results, click on the registration of the vehicle you want to work on. A page will be displayed listing the basic
details of the selected vehicle (see FAQ’s – Why can’t I find the vehicle I am searching for in the vehicle database?)
Fill in the required information, continue to the bottom of the page, and click ‘Proceed’.

STEP 2
Adding a Line Item
You have now created a job sheet and you will be able to see the job sheet reference displayed at the top of the screen along with the status of the job. You can use this job sheet reference to find the job sheet in your mailbox area (see FAQ’s – Where can I find a job sheet?) You now need to select the work required. Simply click on ‘Add line item’ at the bottom of the screen (see FAQ’s – Where is the ‘Add line item’ option?)

STEP 3
Selecting Work Type
You will see a number of icons displayed in the middle of the page (shown below). These icons represent the different categories of work that your service centre offers. Click on the appropriate icon to continue (see FAQ’s – Where are my work options?)

Service
Click on the service option and select the service description from the list given.
If this is a fixed price service you can select the ‘Fixed price job’ button and this allows you to enter a total cost. You can add parts and fluids for this service at a later stage, but no costs will be added for these items.
For variable price servicing the system will automatically show the relevant standard hours for the job and the labour rate for this customer. If required you can amend ‘Actual hours’, the labour rate, and add any goodwill contributions. 1link will calculate the labour total from these values. Please ensure the correct GST rate is applied.

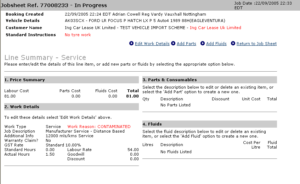
Once the service description and labour total have been added click on ‘Save details’, you will now be taken to the line summary. This is split into 4 sections:

Price Summary – This shows an overall summary of this line item (labour/parts/lube costs).
Work Details – This shows the labour time/costs that were entered at the start of the process. This can be edited by clicking on ‘Edit work details’ at the top of the screen.
Parts/Consumables – This allows you to add any parts to the line item (i.e. this service). Click on ‘Add part’ and enter the quantity, part number, description, discount, goodwill and unit price. Then click on ‘Save details’.
Fluids – Lubricants and other fluids are added by selecting ‘Add fluid’. Add the quantity (litres), fluid type, description, discount, goodwill and unit price. If fluid prices have been loaded within your tariff management you can select them by clicking on ‘Select fluid prices’ and selecting the relevant fluid. Remember to click on ‘Save changes’ once you have finished configuring the
fluid details.
Once all items are added, click on ‘Return to job sheet’.
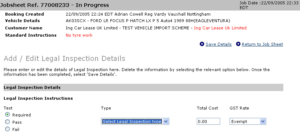
Legal Inspection
Select Legal Inspection – set ‘Test Result’ to required, failed or passed. Once known you must also enter the details of the Legal Inspection including certificate number and expiry date. Please ensure the correct GST rate is applied.
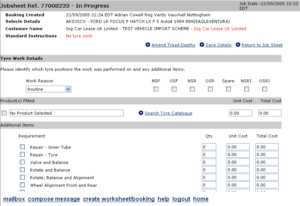
Tyres
Firstly you will need to select the position of the tyres that are being repaired / replaced; this is done by using the available tick boxes with the different positions of the tyres.
Once the number of tyres and their position has been established the tyre catalog can then be used to find the correct tyre and its associated price, this is done by selecting “Search Tyre Catalog” which will display a search screen where the dimensions of the desired tyre can be chosen.
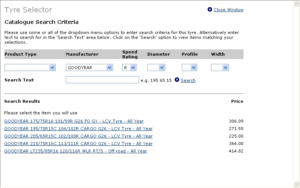
Once the criteria has been entered select “Search”, doing this will display all of the matching tyres:-
Select the tyre required, this will then take you back to the previous screen and where a total will be displayed. Extra work can be selected such as balancing or alignment and once all tyre work has been entered click on “Save Details”
Repair
In ‘Search text’, enter the repair item that you wish to find (e.g. wiper, bulb, pad etc) then click ‘Search’. Alternatively, select the repair category and component using the drop down menus provided. This will return a list of work types.

Select the appropriate work type by clicking on the description (see FAQ’s Why can’t I find the repair item?)
You can enter any additional information relevant to the repair you wish to carry out e.g. exact position of the repair.
You will need to select a ‘Line item reason’.
If this is a fixed price repair you can select the ‘Fixed price job’ button and this allows you to enter a total cost. You can add parts and fluids for this repair at a later stage, but no costs will be added for these items.
For variable price jobs the system will automatically show the standard hours for the job and the labour rate for this customer. If required you can amend ‘Actual hours’, the labour rate, and add any goodwill contributions. 1link will calculate the labour total from these values. Please ensure the correct GST rate is applied.
Once the repair description and labour total have been added, click on ‘Save details’ and you will now be taken to the line summary. This is split into 4 sections:
Price Summary – This shows an overall summary of this line item (labour/parts/lube costs).
Work Details – This shows the labour time/costs that were entered at the start of the process. This can be edited by clicking on ‘Edit work details’ at the top of the screen.
Parts/Consumables – This allows you to add any parts to the line item (i.e. this repair). Click on ‘Add part’ and enter the quantity, part number, description, discount, goodwill and unit price. Then click on ‘Save details’.
Fluids – Lubricants and other fluids are added by selecting ‘Add fluid’. Add the quantity (litres), fluid type, description, discount, goodwill and unit price. If fluid prices have been loaded within Tariff management you can select them by clicking on ‘Select fluid prices’ and selecting the relevant fluid. Remember to click on ‘Save changes’ once you have finished.
Once all items are added, click on ‘Return to job sheet’.
Investigate/Other
Any work that cannot be defined as any of the previous work types can be added using this option. You can type the work description and enter a cost for the labour, parts and lubricants. Remember to click on ‘Save changes’ to return to the job sheet.

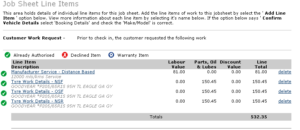
STEP 4
Amending a Job sheet
Once the job sheet has been completed, you are able to view the entire job sheet including a table of the line items you have added. In the table there is a breakdown of your labour, parts and fluid pricing by line item, and a pre-GST total for your job sheet. To delete an entire line, click on ‘delete’ to the right of the item.

If you need to amend any of the details of an individual line you can edit and re-save the details. Click on the line item description to view the line summary screen. From the line summary screen you can edit parts and fluid details by clicking on their description, highlighted in blue. To delete a part or fluid, simply enter a quantity of zero against it.
STEP 5
Requesting Authority
Once you are happy with your job sheet details, including pricing, you need to request the authority to carry out the work. From the main ‘Job sheet’ screen, click on ‘Request authorisation’ (next to ‘Add line item’).

When requesting authorisation you may want to provide some brief notes on the created job sheet.
This is just to provide more detail relating to the work and gives you the chance to add any information that you feel would benefit the fleet.
Click on ‘Send authorisation request’ to send the request, you will have to wait whilst the system is
obtaining authority from the fleet.
You will get a message returned to you explaining what is happening to your authority request. There are 2 types of message that you might get in response:
Authority Approval – your request has been automatically authorised. You can now carry out the
work requested and complete your jobsheet.
Authorisation Referred to Fleet – your request has been referred to the scheme operator’s authorisation team for manual processing.
If the job sheet is referred, you will need to return to your mailbox and await a response from the fleet. If your job sheet is approved, go to Step 6.
When an authority response arrives in your inbox, use the link provided to return to the job sheet. You will be able to see an icon to the left of each line item which describes its authorisation status.
If the fleet operator has declined or modified any items, they should have entered notes in the ‘Authorisation Details’ section to let you know why.
If the vehicle requires any additional work after the initial authorisation, you need to return to Step 2, add any new line item(s), and obtain authorisation. Repeat as many times as necessary until all the work on the vehicle is authorised.
STEP 6
Completing and Invoicing
After authorisation is received ensure that all the pricing in 1link matches your internal system. Once that is done, you will need to send an electronic invoice to the fleet. This can be done by selecting the ‘Completion/Invoice Details’ option on the job sheet.

Once you are satisfied with all of the job sheet details, click on the ‘Yes’ button next to ‘Job Complete’. This will automatically enter the completion time and date (you are able to edit these if you wish). Select ‘Close Job sheet/ Invoice’.
NOTE: Once a job sheet is closed you cannot edit the job sheet details
Once the invoice form appears on your screen, fill in the required fields. If you are producing a separate invoice on your DMS system you must include its reference in the invoice number field on the 1link invoice form. To complete the invoice click on ‘Raise Invoice/Request Payment’. The electronic invoice will automatically be sent to the fleet. Do not send a paper invoice.

You can raise a partial or full credit against the invoice by using the appropriate link which will appear after the invoice is sent.
Once you have received payment for the work you carried out on the vehicle, you can mark the job sheet as ‘Paid’ in the ‘Completion/Invoice’ details section. This will hide it in your default mailbox view and help you manage your job sheets. (See FAQ’s – Where can I find a job sheet?)
FAQ’s
Q: Where can I find a job sheet?
A: Any job sheet that you create can be found within the mailbox area of the system. Whilst in progress, the job sheet can be viewed in the mailbox jobs in progress area. Certain filter criteria can cause the mailbox to ‘hide’ job sheets. To get the job sheet back into view simply edit the filter criteria.
A common problem is when you are trying to locate a job sheet that is more than 2 weeks old. The default mailbox setting is to show job sheets from within the last 2 weeks. To bring up job sheets produced before the default, alter the filter criteria to ‘Any Date’ and this will allow all job sheets to be viewed.
To view job sheets that have been marked as ‘Paid’, select ‘Paid Transactions’ from the Display filter.
![]()
![]()
Q: Why can’t I find the vehicle I am searching for in the vehicle database?
A: Firstly, make sure you have entered the vehicle registration correctly. If the database search still does not return a matching vehicle, you will need to contact the fleet operator concerned as they may have set the vehicle as non-maintained.
Q:Where is the ‘Add line item’ option?
A: If ‘add line item’ doesn’t appear and is replaced by a ‘Confirm vehicle details’ option, don’t panic. This occurs when the database details for the vehicle haven’t been accurately entered. To correct them, click on the link, re-enter the vehicle description, save changes and continue.

Q: Why can’t I find a repair item?
A: When adding a repair item you have 3 fields in which to search. The simplest search is to type text into the ‘search text’ field (e.g.”wiper”) and click on ‘search’. This will search all repair categories and components for matching text and show the results. Alternatively, you can use the drop-down menus to display all of the jobs in a repair category or jobs relating to a specific component within the category. You can even use a combination of all three fields.
Q: How do I cancel a Job sheet?
A: Go into the job sheet you wish to cancel. Click on the ‘Booking Information’ option at the top of the job sheet. In ‘Booking Information’ you have a new set of options at the top of the page, one of which is ‘Cancel Job’. Click on ‘Cancel Job’, enter a brief cancellation reason, and then select ‘Cancel Booking’ to confirm the cancellation. Your job sheet will now be marked as cancelled and will be removed from the ‘Jobs in progress’ section of your mailbox.
Q: Where are my work options?
A: When you add a line item and the work options do not reflect the services you offer, you will need to amend the details held about your service centre. From the main menu select ‘Service centre information’, within the page change the repair types offered.