

Your guide to getting started
1link prides itself on offering the highest possible support to its customers. If you have any queries or problems, please call our support line on 1300 132 655.
Here are a few simple steps to get you started.
STEP 1
Obtaining your login password
To access the 1link Service Network you need a user name and password. Instructions on obtaining any relevant user name and password are contained in the letter forwarded with this pack.
Once you can access the system, you will be able to modify your password and set up other users on the system if required.
STEP 2
Accessing the system
Now that you have your user name and password, you are ready to access the 1link Service Network for the first time. In your Internet Browser, go to www.1link.com.au

Enter your user name and password into the 1link member login area, then click on ‘Login’.
*Technical details regarding supported browsers and platform information are given at the end of this document.
The first time you access the system you will be asked to accept the 1link Service Network Terms and Conditions in order to continue.
The system will display the 1link Repair Outlet home page. This page allows you to access all areas of the 1link Service Network system to allow you to edit your Repair Outlet information and activate your entry in the 1link directory.
To access any of the areas, simply select it from the menu. The ‘help’ option at the foot of the screen provides information to help you use the system as well as our support contact details.
STEP 3
Updating repair outlet details
You will now need to check that the repair outlet details held in 1link Service Network are correct and complete. To do this, select the ‘repair outlet information’ option from the home page. The system will display the details specified on this service centre’s application form.
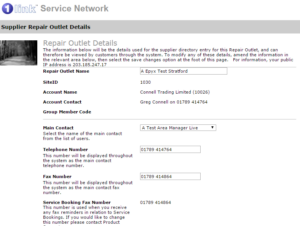
Please review and edit, if necessary, the information held for your repair outlet. Please use the scrollbar to move down the page and view further details.
The following information, which can be edited on this page, is displayed to your customers through the 1link platform. It is therefore important that the following entries are correct and complete:
- Repair Outlet Name
- Telephone Number
- Fax Number
- Address
- Site Type
- Coverage Type (if mobile)
- Repair Types Offered
- Additional Services
- Opening Hours
- Booking Lead Time
So that you are instantly notified when a new item is received in your 1link Service Network mailbox, please enter an e–mail address into the Notification E–Mail section. This will forward an e–mail to the address you specify if a new 1link mailbox message has not been opened within 10 minutes of receipt. Select ‘Save Changes’ to update your changes and directory details.
STEP 4
Setting your tariffs
To enable Scheme Operators to view your rates, it is critical to set up at least one tariff to cover work received via the 1link platform. Access the tariff area by selecting ‘tariff management’ from the home page. The system will display the tariff management page.
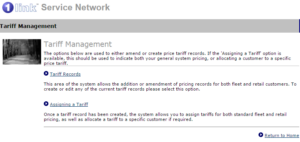
Select ‘Tariff Records’. The system will normally display a list of existing tariffs set up in your system, if this is the first time you have accessed the system there will be none.
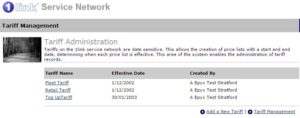
Select the ‘add a new tariff’ option to set up a new tariff.
The first tariff you create should be details of the pricing you will offer to your general fleet customers. As fleet customers join the platform you can create additional tariffs specifically for that customer. This tariff can then be assigned in the ‘Assigning a Tariff’ area.
We suggest that you individually name each tariff ‘Fleet Standard Pricing Tariff’ and/or ‘<name of Scheme Operator> Tariff’ so that you can easily identify them if you need to amend these details later.
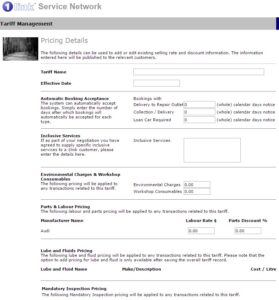
As a minimum on this page you should enter a tariff name and an effective date (put today’s date to make it effective immediately). You must also enter a labour rate and standard parts discount (please leave as 0.00% if you do not wish to offer a discount) for each of the manufacturer(s) for which you are offering services. Tyres and Legal Inspection pricing need only be completed if you are offering these services in the directory.
Once you have created your tariffs, you will need to assign them. Return to ‘Tariff Management’ and select ‘Assigning a Tariff’.
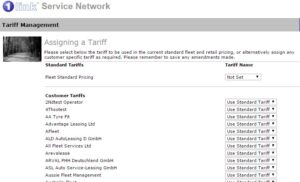
Now use the dropdown menus to assign your ‘Fleet Standard Pricing‘ and any specific Scheme Operator tariffs which you have created. Once you have assigned all of your tariffs, select ‘Save Changes’ to update your system tariff details.
STEP 5
Ready to go
All work booking requests you receive via 1link Service Network will be displayed in your 1link mailbox.
Further information on using the system can be found by selecting the ‘help’ option at the foot of the page when you are logged in to 1link.
Please refer to your ’Guide to Creating a Job sheet’ in order to create your first job. If you need any assistance, please contact 1link Support on 1300 132 655.
*Technical Specifications
Specifications details regarding supported browsers and platform information are as follows:
- Internet Explorer 5.01 SP2 (and later)
- Windows 9X/NT/2000/XP.
- JavaScript must be enabled
- Frames are used
- Browsers must support http 1.1 connections and 128 bit encryption